Hiking the Enchantments in Washington should be on any nature-lover/hiker’s bucket list. It’s absolutely incredible! While it is possible to do this hike in one day, the best way to do it is to stay overnight and make it a backpacking trip (which you need a permit for). Keep reading for tips on how to get a coveted Enchantments permit and make this bucket list hike a reality!

This post contains affiliate links, which means that I may receive a small commission if you book through my links, at no extra cost to you.
SEE ALSO: Your Guide to an Epic North Cascades Camping Trip
Enchantments Hike Overview:
- Miles: 20.5 for the full thru-hike, or about 15 miles for Stuart Lake – Core Zone and back (which is the route that I took)
- Elevation Gain: ~5,000 feet
- Trailhead: Either Stuart Lake or Snow Lake (I recommend Stuart Lake)
- Closest Town: Leavenworth, WA
- Closest Airport: SEA
- Permits Required? Yes, for overnight
The Enchantments are definitely in my top list of most beautiful places in the world. The scenery is dramatic and breathtaking. From bright blue alpine lakes nestled among the trees to jagged rock formations with mountain goats scrambling next to you – this hike has it all.
When is the Best Time for Hiking the Enchantments?
The best time to go hiking in the Enchantments is mid-July through early October. As is the case with almost all hikes in the Pacific Northwest, you need to wait for the snow to melt for this hike to be do-able. I did the hike September 9th-11th, for reference.

Let’s Talk Enchantments Permits
While the hiking the Enchantments itself is definitely challenging, the hardest part of this whole endeavor is securing a backpacking permit. Remember when I said earlier that hiking the Enchantments is a bucket list item? It is, so much so that it’s on every hiker’s radar, which means that getting a permit is super competitive. Many people do the thru-hike as a day hike (which you don’t need a permit for) but in my opinion, that’s pretty grueling and would make the experience not as enjoyable. I highly recommend getting a permit and backpacking the Enchantments for at least 2 nights. You won’t regret it!
Also, don’t even think about trying to backpack the Enchantments without a permit – they are super strict and will stop you on the trail and ask to see it (it happened to us!)
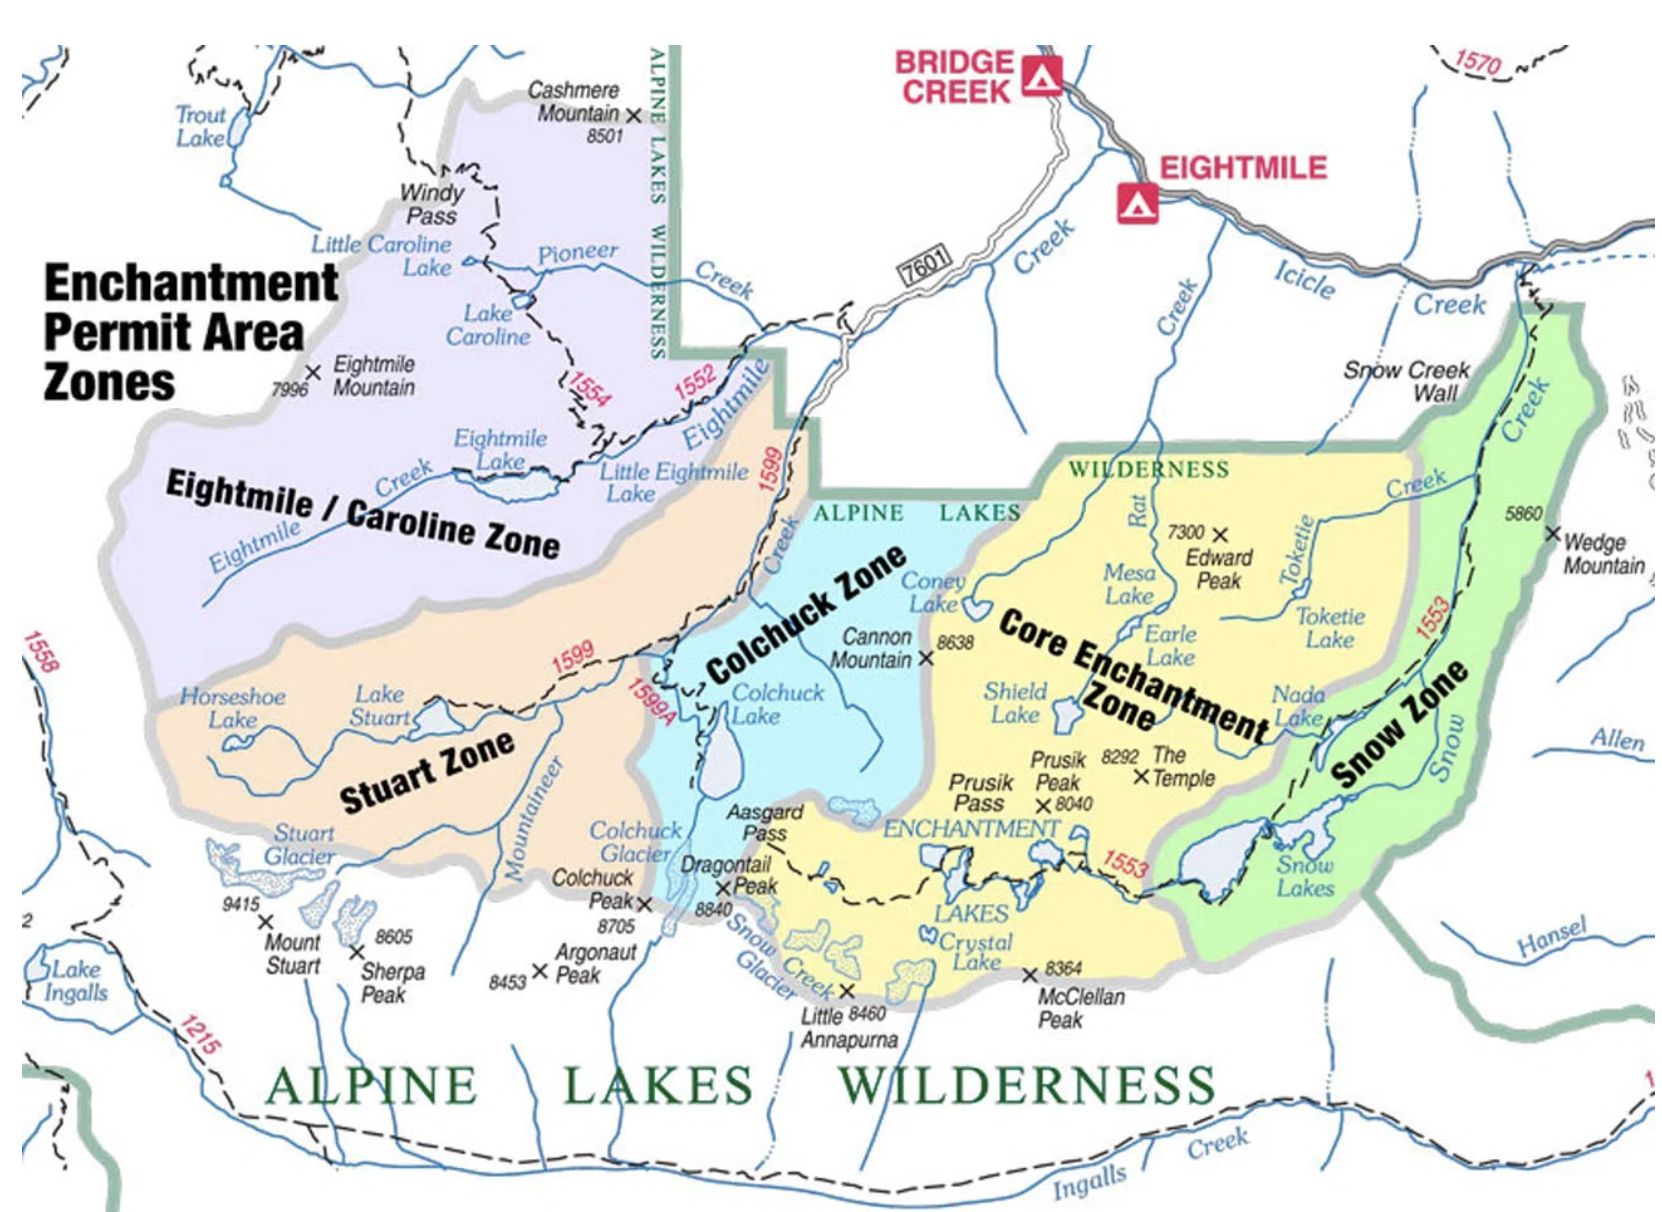
In the permit zone map above, you can see the 5 different zones for which you can get permits. The most popular and highly recommended is to get the Core Zone permit, which means you can camp anywhere in the Enchantments area. This is the permit you should strive for (however you can still make it work with a different zone if that’s all you can get).
For instance, the next-best permit to get (if you can’t get a Core Zone permit) would be either the Snow Zone or Colchuck Zone. With one of these permits, you can camp either at Colchuck Lake or Snow Lakes and then do a day-hike into the Core Zone from there. The ultimate goal of this hike is to see the famed “Core Zone”, whether that be sleeping there with a Core Zone permit (best option) or simply day hiking into the Core Zone to check it out.
When To Apply for an Enchantments Permit?
The lottery for Enchantment permits happens February 15th – March 1. You can apply for a permit anytime during this window, and they randomly select the permit winners on March 8th. You then find out if you won a permit by logging on to your recreation.gov account on March 17th, and you must “claim” it by March 31st. Any permits that were unclaimed by March 31 then go back into the system for others to reserve starting April 1.
More details about the permit process
I Didn’t Win the Enchantments Permit Lottery… Now What?
There is less than a 2% chance that you will win an Enchantments permit through the lottery (I was NOT one of the lucky ones to win it via lottery). But don’t worry! There are other ways to get an Enchantments permit that most people don’t think about.
- Stalk recreation.gov for cancellations
- Get a Walk-Up Permit (online!)
- Pay $15 to Outdoor Status to be alerted of a cancellation for your preferred dates
The easiest way to score a Core Zone permit for the Enchantments is to sign up for Outdoor Status to track permit cancellations for your preferred dates. If someone cancels a permit for your dates, they will text you. Then, just log on right away and snag it! I’ve had a lot of success using Outdoor Status for scoring hard-to-get permits. It definitely beats spending tons of time stalking Recreation.gov for cancellations yourself!
The second easiest way to score a Core Zone permit is via the Walk-Up method online! Only 24 people are allowed to enter the Core Zone per day: 16 via the permit lottery, and 8 are reserved for the walk-in lottery. While the walk-in lottery used to be in person, since COVID, they have moved it to an online process. It used to be that they would, a week beforehand on Sundays, release the walk-up permits for the upcoming week for all zones. This is how I got my Core Zone permit.
However, in 2024 they updated the online walk-up permits to include geo-fencing. You now have to be located within the geofence, (a one-mile radius from the Leavenworth Ranger Station) to apply for a walk-up permit for the next day. It is not required to stay within the geofence once an application has been submitted. Successful applicants are notified the same day via email, and are required to pick up their permit in person at the Leavenworth Ranger Station the day before the hike. Apply between 7:00 am PT and 10:00 am PT the day before the desired hike day. See more info at recreation.gov.
My friend and I already had our flights booked from LA to Seattle, had our rental car booked, and everything else for our trip. We decided that if we didn’t get lucky with the online walk-in permits, we would do a day hike to Colchuck Lake (or maybe further) and we were ok with that. If you don’t live local to Washington, and are hoping to score walk-up permits, this is the mindset you need to have!
I Scored a Core Zone Permit for The Enchantments – Now What?
It’s time to plan your Enchantments hike!


There are plenty of different options on how to tackle hiking the Enchantments, and having a Core Zone permit means you can do it however you want. There are two main options that I will talk about in this post:
Option 1: Thru-Hike from Stuart Lake Trailhead to Snow Lakes Trailhead (most popular)
Most people, especially with Core Zone permits, opt to do the full thru-hike starting at Stuart Lake Trailhead and ending at Snow Lakes Trailhead. While you are able to start at Snow Lakes Trailhead, the hike itself is more ideal if you start from Stuart Lakes Trailhead instead. This way, you get most of the elevation gain over with in the first part of the hike (up Aasgard Pass) and have a more pleasant time for the rest of the hike, versus slowly and continuously gaining elevation the whole time if you start from Snow Lakes.
If you are only planning to spend 1 night, you could hike up Aasgard Pass and then plan to set up camp by one of the lakes up there, and continue on in the morning. If you are planning for 2 nights, You could spend the first night at Colchuck Lake and the second night up in the Core Zone, or spend two nights in the Core Zone! Either way you choose, beautiful views await.
Just remember that if you opt to do the whole thru-hike, you will need to figure out transportation since you will be ending at a different trailhead than you started from. Stuart Lake Trailhead and Snow Lakes Trailhead are about 30 minutes apart. You can either:
- Rent two cars (if you are doing this hike with a friend) and park one at each trailhead
- Use the Leavenworth Shuttle for one leg. Make sure to reserve in advance.
- Use the Loop Connector Shuttle
Option 2: Hike from Stuart Lakes Trailhead to Core Zone and Back (this is what I did)
When I was doing research on hiking the Enchantments, I was looking for someone who did the hike up Aasgard Pass to the Core Zone and then back down to Stuart Lake, but couldn’t find any research on it! It doesn’t seem like a popular way to hike the Enchantments. My friend and I chose to do it this way because:
- From what we read, the last 6 miles of the thru-hike (towards Snow Lake) are a steep descent with minimal views and apparently this point of the hike becomes grueling and boring. So, we figured it would be ideal to avoid this part of the hike if we could and just stick to the most epic parts.
- Doing it this way made it easier to not have to figure out transportation between trailheads, since we would be coming back to the same trailhead we started from.
- We had a flight to catch on the same day we were hiking out, so doing it this way shaves about 5 miles (and a bit of time) off
Now, I’m not here to convince you to do the hike this way. Most people feel accomplished completing the entire thru-hike, making it all the way to Snow Lakes trailhead. If that’s you, then that’s great! But if you are interested in the journey we took with this alternative route, keep reading.
What About the Infamous Aasgard Pass?

The one hesitation we had about doing the hike this way was that we would have to go both up AND down Aasgard Pass.
If you aren’t familiar, Aasgard Pass is the most intense part of the hike, where you climb about 2,000 feet in elevation in just 1.5 miles! It’s also the highest point of the hike. The trail can be hard to find at times, as you’re basically scrambling uphill and climbing over rocks. One great point of advice is if you’re looking up at Aasgard Pass, make sure you stay to the left of the “island” with trees as you’re climbing up.


In my research, I found a ton of descriptions of what it’s like climbing up Aasgard Pass, but did not find much info on what it’s like to climb down it. From my experience, it really wasn’t that bad climbing down (easier and faster than climbing up it!), and I stand by our decision to do the hike the way we did. It was worth it! AND it was on our hike down Aasgard Pass that we got to see two mountain goats up close, which was SO cool.
My Enchantments Hike Itinerary:
I don’t normally detail my hikes out like this in a blog post, but I feel like it’s helpful to know how long hiking the Enchantments takes for each section so you can visualize it for yourself and start to plan your own hike!
Day 1: Stuart Lake Trailhead to Colchuck Lake

We got a late start, as we started the hike the same day we flew into Seattle. Pro tip: book your rental car from DiscoverCars for the best selection! It took us about 2.5 hours to get from Stuart Lake Trailhead to Colchuck Lake. We started at 4:30pm and got there right as the sun was about to set, around 7pm. The views at Colchuck Lake are incredible! Even though we arrived to Colchuck Lake Friday evening, we saw barely saw any one else there and were able to score an epic campsite right on the edge of the lake. We set up camp, enjoyed the sunset, cooked our dehydrated meal, and went to sleep.
Day 2: Colchuck Lake to Core Zone (Inspiration Lake)
We packed up and started our hike around 9:30am. We got to the base of Aasgard Pass around 10:30am, and it took us about 3 hours to climb the 1.5 miles to the top.
Pro tip: bring gloves (we just got these cheap ones) for the scramble up Aasgard Pass. You’re pushing off/touching a lot of rocks with your hands, so it’s much more comfortable with gloves on!
As an Amazon Associate I earn from qualifying purchases.

Once you get to the top of Aasgard Pass, it’s smooth sailing! Then you have finally reached the famed “Core Zone” of the Enchantments. It’s epic.


It’s a fairly flat and chill hike from this point. For a lot of the time, you’re walking along a smooth rock surface that’s wide open and with different lakes all around. We took our time and stopped a lot for pictures before setting up our tents at Inspiration Lake. We chose a campsite spot pretty much right as Inspiration Lake came into view, so that we could drop our packs and then go exploring further with just day packs on.

Walking further down to the shoreline of Inspiration Lake was beautiful, and we even jumped in and swam around a bit. There were some wild mountain goats hanging out around the lake. The whole day was just such a magical experience!


From Inspiration Lake, if you’re feeling up for it, you can also keep going to check out Perfection Lake and Leprechaun Lake which are fairly close by.
After that, we headed back to our campsite at the top of Inspiration Lake and enjoyed the views.
Day 3: Inspiration Lake to Stuart Lake Trailhead

We started the hike back out around 7am and got down to the bottom of Aasgard Pass by 10:30am. Like I mentioned previously, hiking down Aasgard Pass was definitely do-able. Just make sure you don’t lose the trail, and watch your footing so you don’t slide! We made it down to the Stuart Lake Trailhead about 3 hours later, completing the hike out by 1:30pm.
Getting to The Enchantments
The closest major airport is Seattle (SEA). You’ll then need to rent a car and drive about 2.5 hours to the town of Leavenworth. Leavenworth is a super cute Bavarian village type of town! If you can, definitely plan to spend some time here before or after your hike.
Where to Stay in Leavenworth

The day before your Enchantments hike, relax in a hotel in the cute town of Leavenworth. My two recommendations:
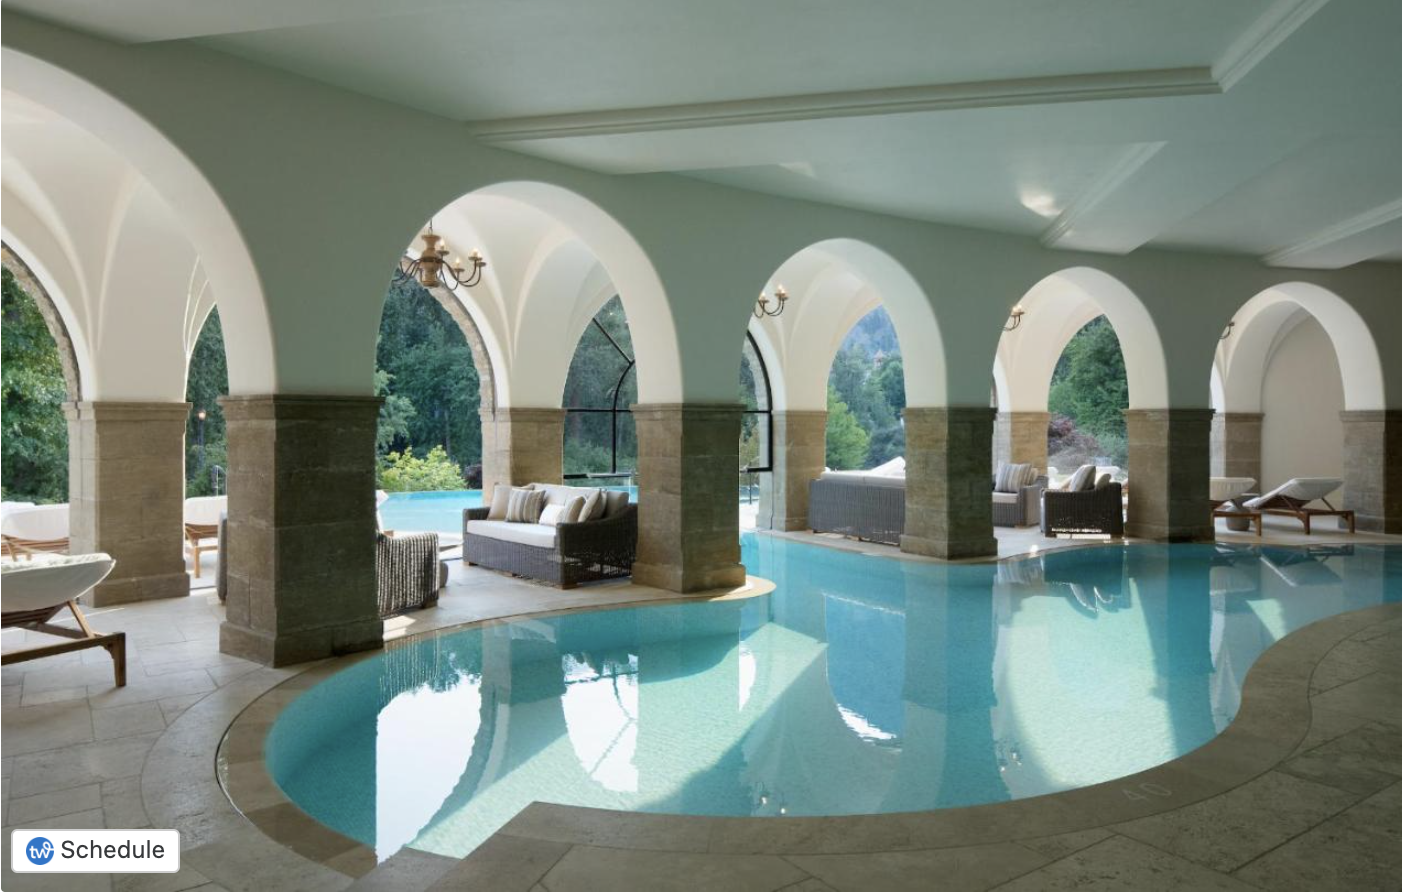
Luxury option:
This hotel is conveniently-located right in the center of downtown Leavenworth, walking distance to bars and restaurants, but it backs up to the river so you still feel a bit secluded. It looks like a beautiful and relaxing place to stay, and has great reviews! It’s also adults-only.
More Budget-Friendly
This upscale hostel is also in a great location in Leavenworth and has a cafe in the lobby, as well as a great common area to get some work done if needed. Although we didn’t stay here, we did spend a few hours here before our hike sending out some last minute emails and getting everything together. This place has great vibes!

What to Pack for Hiking the Enchantments
Besides the obvious essentials, don’t leave home without:
As an Amazon Associate I earn from qualifying purchases.
- Hiking Boots (These are my favorite!)
- Cliff Bar Energy Chews (to give you energy on the hike!)
- Dehydrated Meals (this one is my absolute FAVORITE! I bring it on every backpacking trip)
- Sleeping Bag (This is the one I have that I love!)
- Nano Puff Jacket (I bring this on EVERY camping trip. It packs up small and keeps you warm!)
- Travel Towel (perfect for backpacking!)
- REI Quarterdome Tent (great beginner backpacking tent. I love this thing)
- Inflatable Sleeping Pad (this is the one that I use)
- Camelbak
- Portable phone charger (so you’ll have enough juice to take pics!)
- Deuter Backpacking Pack (I’ve used this same one for 4 years now and it’s been great!)
- Jetboil – this is a game-changer. Boils water in under 90 seconds!
- MSR Water Filter – one of the best products for filtering drinking water on the trail!
- Ultralight First Aid Kit
- Gloves for Aasgard Pass (these are the cheap ones we got that did the job)
Hopefully this post is helpful in planning your Enchantments hiking trip! Enjoy!


Thanks for the details. Enjoyed reading all the way through.
I live in WA, but the ridiculous lottery system has kept us from trying to do the Enchantments, but with your tip on the text alerts being a good spend I will be going for it starting with this year.
Heads up, your link to the portable charger is broken. (I know that when doing these blogs every click and purchase makes the difference.)
Yes- using Outdoor Status to snag permit cancellations has definitely relieved some anxiety for me when it comes to planning backpacking trips and having to be so on top of it 6+ months beforehand to remember all the dates to apply! I hope you guys get lucky and get a core zone permit this year! Also – thanks so much for letting me know about the broken link. Just updated it!
Thank you for this guide and all of the pointers! I’m considering taking the route you did this summer if I can get the permit. Just curious if you happen to know the total mileage from Colchuck to Inspiration? And then inspiration back to the trailhead?
Of course! Glad you found it helpful! I can’t quite remember, but I believe it was about 3-4 miles from Colchuck Lake to Inspiration Lake (1.5 miles to the top of Aasgard Pass and then another ~1.5 miles from the top to Inspiration Lake). And then about 7-8 miles from Inspiration Lake back to the trailhead.
Thank you for this as some guide, planning a trip this year. One question I had which may sound silly but is there a specific Stuart lake trailhead? I can only see the eight mile trailhead. Our group was hoping to head out, camp in the core zone and then hike back down the next day, similar to what you did but with only 1 night. How long would you expect us to hike from the preferred trailhead? (Eightmile or the Stuart lake trailhead)
Hi! Yes, there is a Stuart Lake Trailhead and I recommend starting there instead of the Eight Mile Trailhead. Stuart Lake Trailhead is closer the Core Zone. It took us about 2.5 hours to get from the Stuart Lake trailhead to Colchuck Lake. From Colchuck Lake, it took us about 4 hours to get from there to the top of Aasgard Pass into the Core Zone. Definitely do-able for your itinerary. I hope you have a great hike!